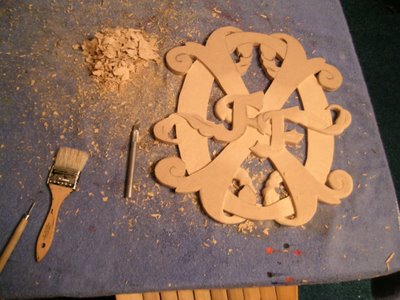
It's about time I showed how I actually make my carvings. I use 3'x5' sheets of MDF (medium density fiberboard) instead of wood. Once the basic outline is drawn, the first step is cutting the outline of the piece with a handsaw, skillsaw or a drill (and in once case, using only hand tools). Once the outline is cut out, I finish drawing how I want to carve the piece. Sometimes I get nearsighted in the carving process and forget which layer goes where so it helps to have pencil markings reminding me of what to do.
The carving process is actually quite simple in nature. The idea of a relief carving is creating depth between two layers side-by-side such that one appears to be closer and one farther away. In this instance, the "X" is supposed to be on top of the "O", except for the scrolling which goes underneath the "O". By alternating over and under, one can create the appearance of once letter wrapping around the other from a solid piece of "wood".

The top of the design is not carved in the photo, it is simply drawn on. As you look toward the bottom of the piece, more of the carving process is complete. People often ask if the carvings are one piece or if I carved the letters out separately. This is part of the beauty of relief carving. Utilizing this type of carving allows one to take a single 3/4" piece of solid material and create the illusion of letters actually curving and wrapping around each other.
In the photo you can catch a glimpse of my tool arsenal. People also always ask how many carving knives I use to get all of those curves and shapes. What's your guess? I'll give you a hint: They are all in the photo. Sorry to disappoint, but I only use a square blade and an exacto knife (99.9% of the time). This tends to disturb people because neither of them have curved blades while much of my work does. I find it easier to stick with one knife instead of constantly switching back and forth between seven knives of various shapes and sizes. Not to mention, I have a hard enough problem keeping track of these two knives. Using solely straight blades, you are forced to be deliberate in your carving as your hand learns to move as if it were a curved blade.

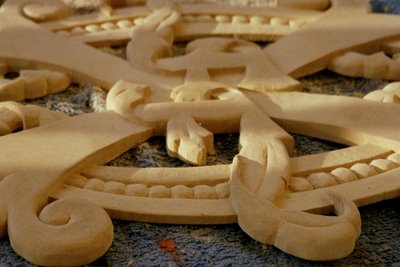
Here's a side shot of the bare carving. Still a little rough in some spots but nearly complete. With this side shot you get a feel for how thin the carving actually is. Time for a little more fine work and then the painting begins.
No comments:
Post a Comment